Official guide · Getting started
Shadowrocket Setup Guide:
Import, Connect, and Verify
Add your details, choose routing, connect, verify the result, and troubleshoot basic issues. Start with a repeatable setup path before adjusting rules or automatic connection settings.
Field names below are kept in their original English. The location of an option may vary slightly between versions; follow the current interface, check the option name, and verify the information entered rather than relying on button position alone.
Step 01 / Enter connection details
Add Server: Add a server or import a subscription
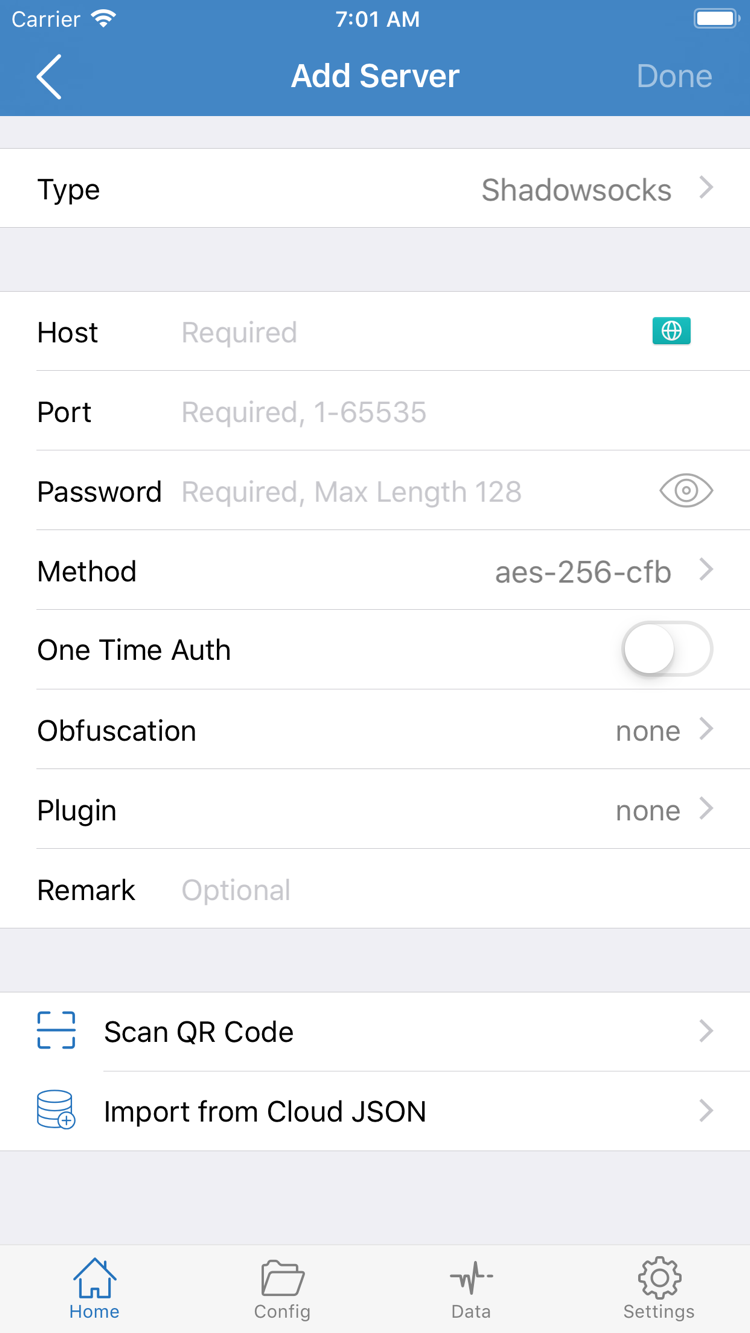
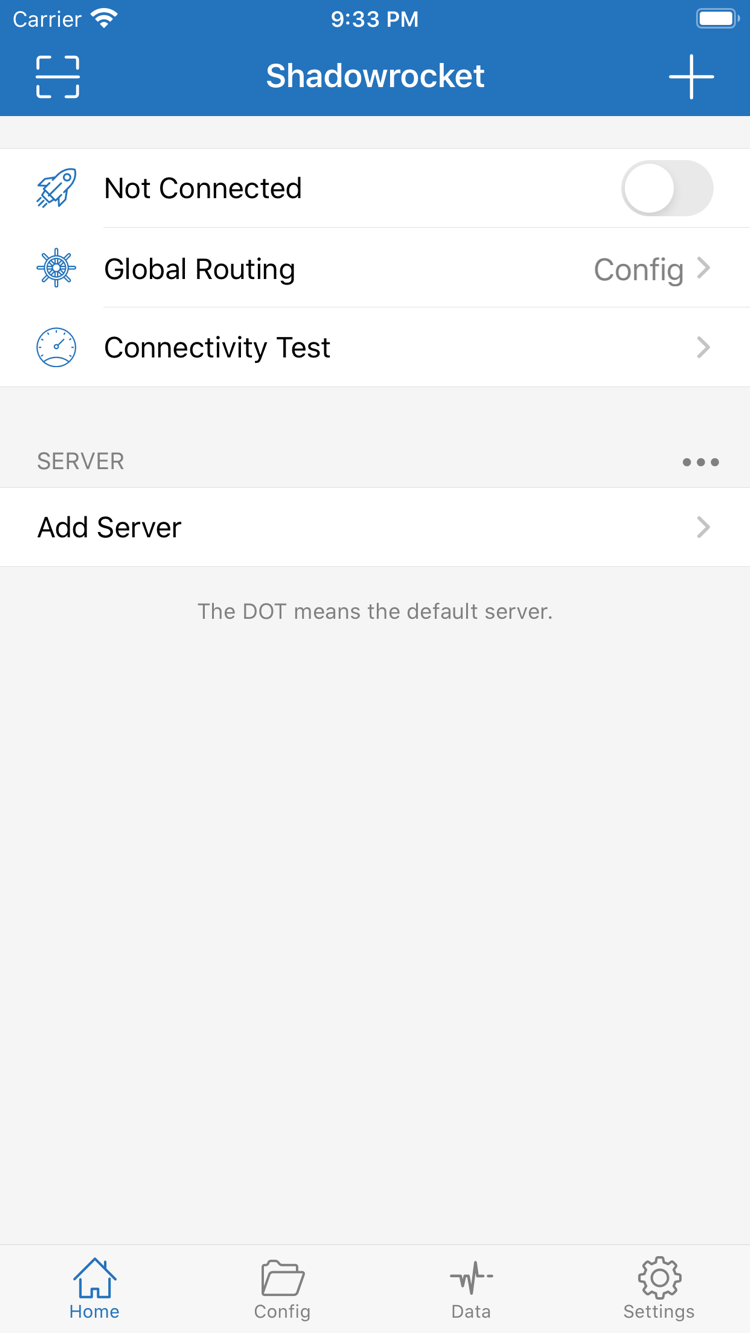
Open Shadowrocket, go to Home, and look for the SERVER group below. If you do not have a server yet, tap Add Server. If the entry appears as an add button, open it and check that the page title is Add Server. Next, choose the method that matches your information: enter a set of server parameters manually, or import a subscription URL provided by your own service provider through Subscribe. There is no need to do both.
Enter details manually: choose Type, then check the fields
In Add Server, first choose a Type that matches the protocol in your service details, such as Shadowsocks, VMess, VLESS, or Trojan. The Type determines which fields are required, so do not fill them all in and then switch protocols at random. The official screenshot on the right shows a form with Host, Port, Password, and Method. Other Types may have different fields; use the details for the relevant protocol rather than filling every field shown in the screenshot.
Enter the server hostname or IP address in Host, the port in Port, and the password specified in your service details in Password. If Method appears, choose the method that matches the server. Do not include spaces, webpage paths, or explanatory text in the hostname, and do not include a colon with the port. Protocol-specific identity, transport, and TLS parameters must also match; do not assume the server does not need them just because the fields can be left blank. Save the entry, return to Home, and check that it appears in SERVER.
Existing subscription: import through Subscribe
If you have a subscription link, choose Subscribe under Type in Add Server, enter the requested subscription URL, and save it. Copy the full link, paying particular attention to any trailing parameters and line breaks. Return to Home after saving and wait for the content to load. Check for a subscription group and its servers. If your version requires a manual refresh, use the update option for that subscription. Seeing the subscription name does not mean the server list has loaded successfully; check the entries in the group.
Subscription links may contain access credentials. Do not include them in public screenshots, chat logs, or troubleshooting posts. Example domains on this page are not usable services and cannot replace your own details. Scan QR Code at the bottom of Add Server can scan a QR code for a server you already have. Import from Cloud JSON is for data in the corresponding format; do not enter an ordinary subscription link there. Choose the entry point that matches the format of your information.
Before leaving this page, confirm that Home has at least one selectable server, then continue to Global Routing. Do not adjust multiple advanced options yet. If the import fails, first check the URL and network. For more help, continue to Troubleshooting.
Step 02 / Decide how requests are handled
Global Routing: Choose a routing mode
Once you have a server, return to Home and open Global Routing. This setting determines the overall handling of requests; it is separate from selecting a server. A server entry provides connection parameters, while Global Routing determines whether and how requests use the proxy. Understand the three modes—Config, Proxy, and Direct—before connecting to avoid confusing a mode selection issue with incorrect server details.
- Config: Apply policies according to the rules in the current configuration file. Different requests may use PROXY, DIRECT, or REJECT; this does not mean every request goes through the proxy.
- Proxy: Handle traffic through the proxy. This is useful for comparison with Config when checking a basic connection. It does not mean the rules are configured correctly or guarantee access to every destination.
- Direct: Connect directly to the destination without using a proxy server. This can help check the current basic network connection, but a webpage loading does not prove that the proxy connection works.
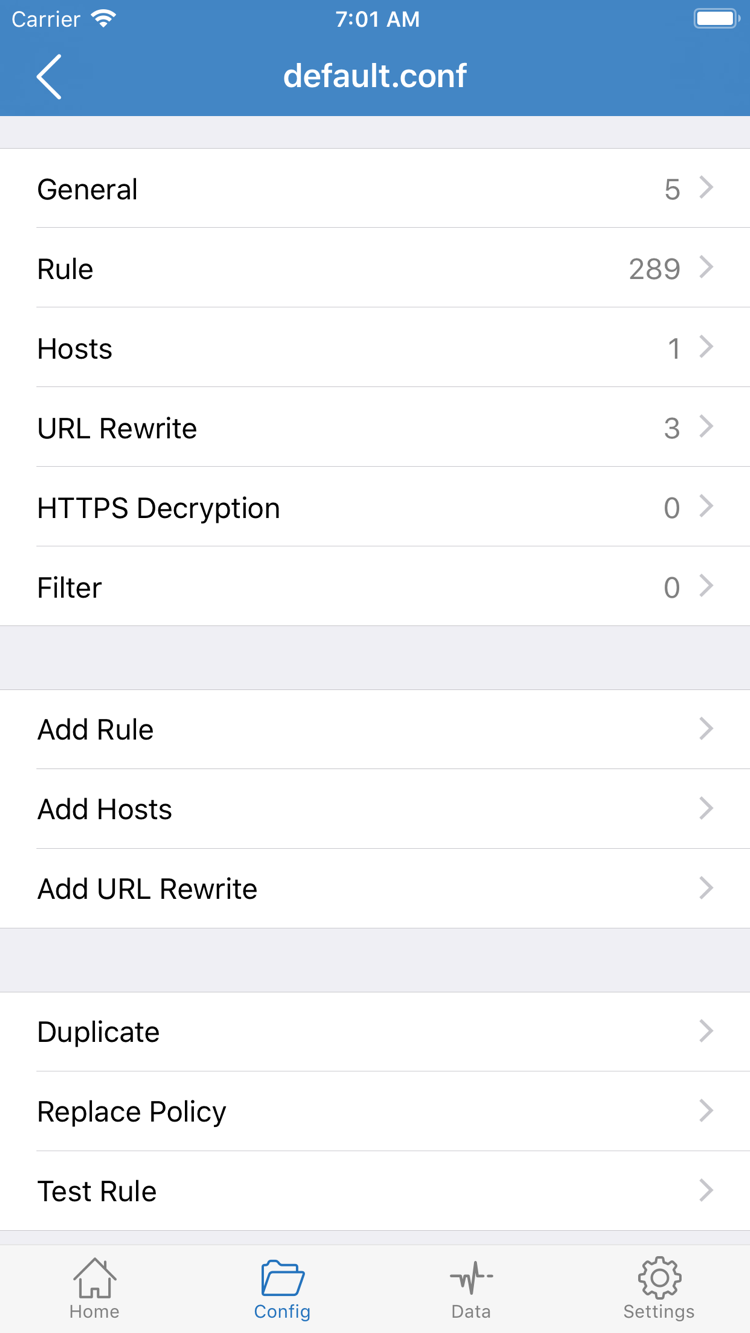
To use rule-based routing day to day, choose Config, then open Config and check the active configuration file. A file appearing in the list does not necessarily mean it is selected for use. Confirm which file is active, then review its contents. The official screenshot shows the General, Rule, Hosts, URL Rewrite, and HTTPS Decryption sections of the configuration editor. For a first setup, focus on Rule; there is no need to change every section at once.
In Rule, read the rules from top to bottom. Place specific conditions where they can be matched; FINAL is usually at the end to set a policy for requests that did not match earlier rules. The example below illustrates the syntax and does not need to replace your existing configuration: the first rule routes an example domain through PROXY, the second sends a private address range through DIRECT, and the last provides a fallback policy.
[Rule]
DOMAIN-SUFFIX,example.com,PROXY
IP-CIDR,192.168.0.0/16,DIRECT
FINAL,PROXY
To add a rule through Add Rule, back up the original configuration first, then check the type, match value, and policy. After saving, confirm that the intended file is still selected. For initial testing, avoid importing large configurations from unknown sources; rule changes alter request paths and make issues harder to locate. See Rule order and FINAL explained for details on match order. Once the configuration is confirmed, return to Home and connect.
Step 03 / Establish the system connection
Connect from Home
Return to Home, select the server you plan to use in SERVER, and confirm that the selection indicator is on the intended entry. A subscription may contain several similarly named entries; do not rely on their list positions. The list may change after an update, so check the selected entry again. Then confirm that Global Routing is set to the mode you chose, so a Direct setting left over from earlier troubleshooting does not affect this test.
Tap the connection switch at the top of Home. When establishing a connection for the first time, the system may ask for permission to add a VPN configuration. Review the prompt, confirm that it was initiated by the Shadowrocket app you just opened, and complete authorization or authentication as required by your device. This system permission establishes a network tunnel; it does not generate server details for you. If you declined the prompt, the app may not connect normally. Try connecting again and complete authorization.
After authorization, return to Home and check whether the status at the top changes from Not Connected to connected. If the switch changes briefly and then turns off, the system prompt is incomplete, or the status remains unexpected, do not immediately change DNS. First confirm that authorization is complete and the current network works, and check whether another VPN connection is affecting this attempt. Disable other connections before testing Shadowrocket on its own; do not change multiple network conditions at once.
Turning on the connection switch only means the system connection process has reached the relevant stage. It does not prove that every server, domain, or app has been verified. Next, run Connectivity Test and check an actual request in a browser. To stop using the connection, turn off the switch at the top of Home. During initial testing, use the manual switch; consider On Demand after the results are stable.
Step 04 / Verify with an actual request
Connectivity Test and webpage checks
Keep the selected server and Global Routing mode unchanged. Tap Connectivity Test on Home and wait for the test to finish. The result helps determine whether the selected entry is reachable using the chosen test method; one number or one successful test does not mean all access is working. If it fails, record the current network, selected entry, and routing mode so you can compare the next test.
Then open a browser and visit a known working website with current content. Check that it loads fully, rather than relying on a title or cached content. Refresh the page and open another page on the same site for comparison. If ordinary webpages load but one destination fails, narrow the issue down to that destination, DNS resolution, or a rule instead of concluding that the entire client is disconnected.
In Config mode, also distinguish between a successful request and a request that followed the expected policy. For example, a request matching DIRECT can succeed without using a proxy server; that does not prove the PROXY route works. Check the destination domain and Rule order to see which rule should match. For further confirmation, review connection records or Diagnostics available in your current version, and take care to hide addresses, credentials, and personal browsing details.
If a request fails in Config but succeeds in Proxy, first check the active configuration file, rule order, and policy destination. If both modes fail, check the server parameters and basic network next. Restore your usual mode after comparing results; do not leave temporary test settings in place. If the test succeeds but a webpage still will not load, read DNS settings and webpage loading troubleshooting. Do not repeatedly switch entries based on the test result alone.
Step 05 / Change one condition at a time
Check Settings based on the symptoms
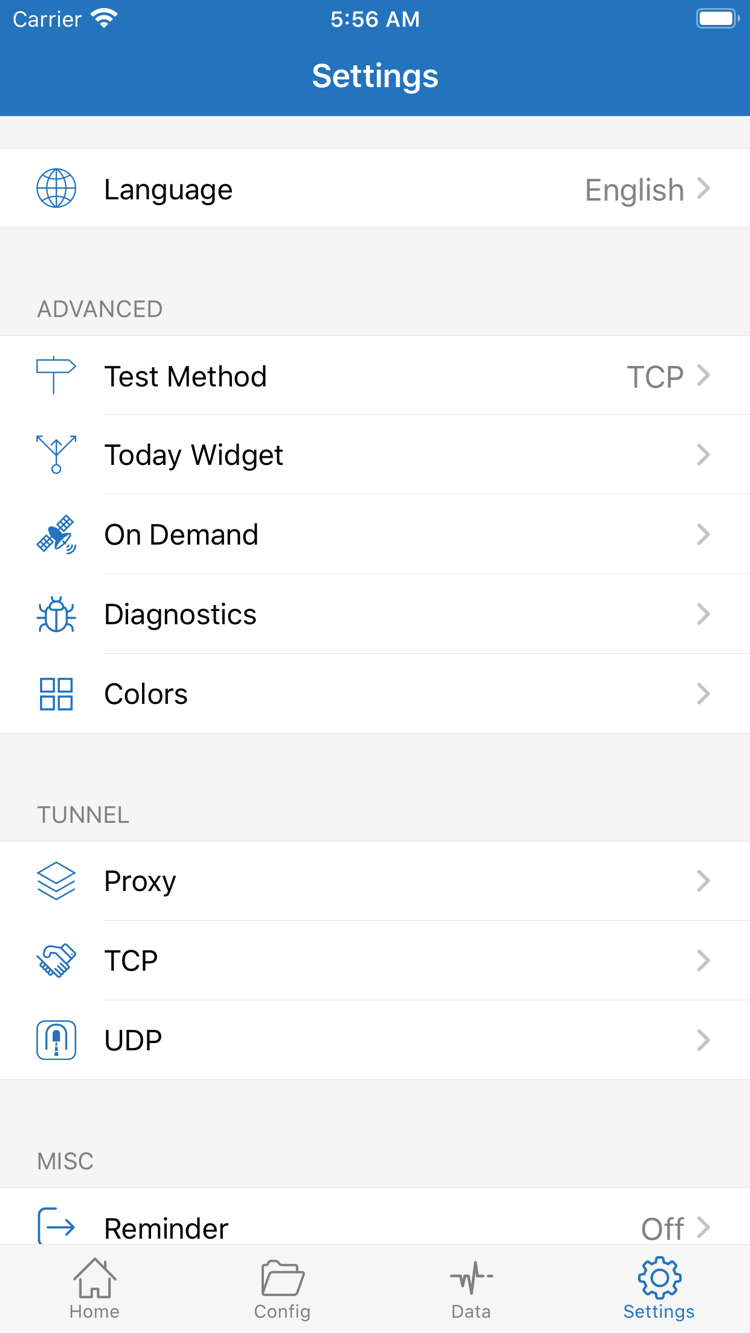
If the first four steps did not produce a stable result, identify the issue from the symptoms before opening Settings. This page includes Language, Test Method, On Demand, Diagnostics, and options such as Proxy, TCP, and UDP. These options serve different purposes; there is no single setting that works for every connection. Do not assume an option must be enabled just because it can be changed.
Nothing imported: check the subscription fetch
Return to Home and check that the subscription URL is complete and that the group contains server entries. Saving the subscription name will not load its list if the current network cannot reach the URL. If your service details have changed, check the URL and its validity again. After importing, confirm that you have not selected an old entry. Do not delete all configurations to troubleshoot; keep the original records so you can compare changes.
Import succeeds but connection fails: check parameters and network
Open the relevant entry for editing and compare Type, Host, Port, and identity details with the original information, one field at a time. Letter case, trailing spaces in a password, and protocol-specific parameters can all affect the result. Test on the current network, then try another network if available. If the symptoms change with the network, check the network environment first. Do not change server fields and configuration rules at the same time, or you will not know which change made a difference.
Test and browsing results differ: check the test method and DNS
Check Test Method in Settings to confirm how the current test is run, then return to Home and run Connectivity Test again. Different test methods examine different stages, so their results cannot be compared directly. If the test succeeds but a webpage will not load, check DNS resolution, destination reachability, and rule matching separately. Limit the scope of changes; avoid changing DNS, rules, and servers all at once.
Connection resumes automatically or keeps changing: check On Demand
If the connection turns on again after you switch it off, check whether On Demand is enabled and whether its conditions match the current network. For initial troubleshooting, temporarily disable automatic activation and repeat the test manually using the switch on Home. Once the issue is resolved, configure On Demand to suit your network usage. It controls when the connection is triggered; it does not correct incorrect server details.
Still unresolved: collect reproducible details
Use Diagnostics to review the diagnostic information available in your current version. Record which step failed, the current mode, the test method, and whether only one destination is affected. Hide subscription links, passwords, and personal browsing records before sharing any information. For individual parameters, system authorization, and other failure cases, continue by category in Troubleshooting. For App Store access or restoring a purchase, read the installation guide; you do not need to buy the client again as part of network troubleshooting.
After troubleshooting, repeat Step 4 and restore the expected Config mode, server selection, and automatic connection settings. Keep a backup of a verified working configuration and record each later change. When a new issue occurs, you can return to a known state instead of guessing from scratch.